Thursday, March 29, 2012

iPad Messenger Bag - Quilted

My sister, who is having knee issues, asked me if I could make something that would make it easier for her to carry the essentials - iPad, iPhone, money for cappuccinos - while she was required to be on crutches. I've always want to give making a woman's accessory (I've already made plenty of neckties) a try using my own brand of embellishment and styling, so I said I'd get started on it right away.

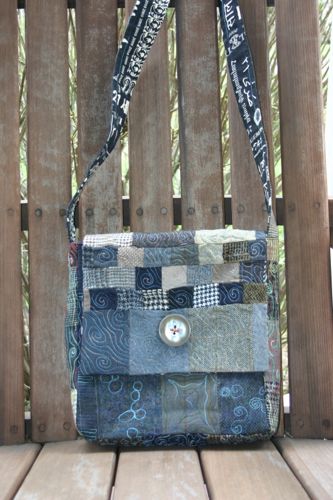
First thing to do -- get the dimensions of a iPad. She wanted a messenger-type bag, but only as big as necessary to hold her iPad. The only other requirement was that it have pockets for iPhone and wallet, and that it have a method of securing it closed.

Next, Googled messenger bag tutorials. There were lots of them. I read through several and put together a set of specifications that would create the size bag I was looking for.

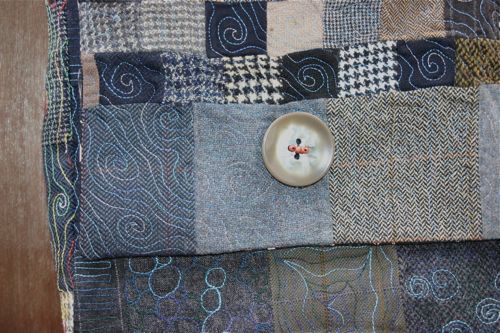
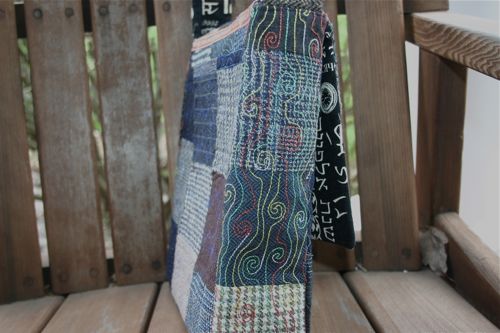
I planned to piece and quilt all exterior parts of the bag, so the next stage was piecing fabric that I'd use to cut out the pieces. I used wool suit swatches that I got from a friend that use to work for Neiman Marcus in Palo Alto, CA.

Once the parts were cut out, I layered the exterior fabric with a woven interfacing, and a muslin backing to quilt the pieces. I played with various types and weights of thread to see what worked best, and even though they were all different colors, I figured it would work with the patchwork look of the bag.

I really liked the look of the Aurifil 12wt variegated thread, unfortunately my supply was limited and I didn't quite have the colors that I wanted. (Obviously I need to increase my thread supply!) So only the sides of the bag use the Aurifil.

I also tried some Valdani 40wt and Superior's 50wt. All nice, too.

The quilting took the most time. The assembly of the lining with pockets and the bag, was fairly straight forward and not as difficult as I had feared.

For the closure, I had wanted to use some sort of toggle closure, but not having one on hand and probably not able to find one any time soon, I opted for a single large button.

This is what the finished bag looks like:

IMG_8854.jpg


IMG_8855.jpg


IMG_8856.jpg


IMG_8859.jpg


Tomorrow I'll mail it off to my sister for some real life testing to see how it stands up to use!

Saturday, March 10, 2012

Rabbit Squared

Ah, the joy of creating art! Now that I finally finished my latest traditional quilt it is time to get back to the art I love. Not that I don't really enjoy making traditional quilts, but it is just not the same thing.

First on my long list of art projects was creating a piece for the annual Studio Art Quilt Associates auction. I'm a professional artist member of SAQA and every year I like to show my support by donating an art quilt for this auction. The auction proceeds are used fund exhibits and programs throughout the year. All pieces in the auction are 12" x 12"

This year the auction will begin on Monday, September 10th at 2:00pm EST and conclude on Sunday, September 30th at 2:00pm EST. The auction pieces are usually up on the SAQA website by July.

This year I decided to use my favorite rabbit design in this small format (12" x 12").

IMG_0445.jpg


Here I have the rabbit design traced on freezer paper, a muslin foundation ready for the fused pieces and my stash of fabrics lined up and ready to use. (The TV remote is being used to hold down the freezer paper that wants to roll up.)

Lately I've been collecting brown and red/brown fabrics in anticipation of working on a large quilt of my Ridgeback, Bree (she is a red-wheaten). I was very glad to have a good range of colors and patterns to choose from. It really makes a difference on being able to get the effect that I want to have.

Here it is finished!

IMG_8796.jpg


I'm calling it "Rabbit Squared #1" (#1 because I really like how it turned out, so will have to make more. You know how rabbits can multiple!)

The fused rabbit was quilted directly onto the background. The background is pieced from leftovers from the traditional quilt I just finished. Serendipitous availability of just the right leftovers is always fun.

The rabbit is free-hand zig-zag stitched around each piece of fabric using a variety of threads: Mettler poly, Sulky poly, and Madeira metallic. The background was pieced with Aurifil 50 wt and quilted with Mettler poly. All of the quilting threads were variegated.

IMG_8799.jpg

Sunday, March 04, 2012

Blueberry Peel Top is Done!

Finally, I have finished work on the Blueberry Peel quilt top.

IMG_8786.jpg


The top is for a Queen size bed - 96" x 108". The paper-pieced block pattern is from Karen Stone's Indian Orange Peel pattern that I purchased way back in 1993 when I took a class from Karen. (Marvelous class, marvelous teacher!)

9418DD63-CAEA-4931-9E9B-6E1D1DF56815.jpg


This is an illustration of how much fun it is to play with colors! You can take a pattern like Karen's and create something that looks so different just by changing colors and layout.

Every once in a while I keep track of the time it takes to make a particular project and I did it with this quilt top.

This is how long it took to finish the various parts:


  • Cut out the paper templates for 296 arcs = 4.35 hours

  • Paper-piece the races = 51.8 hours

  • Trim the edges of the arcs = 3.5 hours

  • Remove paper from the arcs = 9.87 hours

  • Remaining cutting and assembly = 20.18 hours


For a total of 89.7 hours! Multiply that by your basic minimum wage and you'll begin to understand why a hand made quilt should never be sold for anything under $1000. This total doesn't even include material costs, quilting services, or binding. I also wasn't absolutely meticulous in starting my timer the minute I started work.

Granted a less complicated quilt top would probably be completed faster or one that didn't use so many different fabrics. I'll have to time the next quilt I made, just for comparison. (I've got an app for this on my iPhone, so it is more fun than watching a clock!)

For a number of the border layers I used the leftover trimmings from the arc backgrounds. This "scrap" was large enough to cut pieces that were around 1.5" x 2", which I sewed into mini 4-patches or into strips.

It is always fun, and sometimes quite a surprise, to see what my finished quilt looks like when I finally spread out the finished quilt top to take a picture because while I'm working and designing in my tiny studio, my quilt project is generally in a big lumping fabric bunch. The borders and such are designed roughly on paper because my design "wall" is only 4' x 6'.

Next on my project agenda is a 12" x 12" art quilt to donate to the Studio Art Quilt Associates auction that is held every year, usually in the Fall, but I don't have the exact dates yet. I just know the deadline for submission is this month!